Nikoo Samadi
Managing document reviews in SharePoint can take time and create confusion. For example, teams often rely on emails or manual notifications to approve files. As a result, tracking progress becomes difficult and the chance of missed approvals increases. To address this, many organizations use SharePoint content approvals in Power Automate. This setup connects SharePoint and Power Automate to create a clear, repeatable approval workflow. Instead of sending manual reminders, Power Automate handles the process automatically. It not only notifies approvers but also tracks responses and updates the document status in SharePoint.
When you automate SharePoint approvals, you reduce delays and improve accuracy. Every approval follows the same path, and every decision is recorded. This consistency helps teams manage documents with more confidence.
In this guide, you will learn how to set up a Power Automate approval workflow in SharePoint. Additionally, you will see how to use it to improve your SharePoint document approval process. By the end, you will understand how these tools work together to create a simple and reliable document management system.
What Are SharePoint Content Approvals?
In SharePoint, content approvals are a simple way to control what gets published or shared. They make sure every document, list item, or page is reviewed before others can see it. This keeps your site organized and helps maintain quality.
When content approval is turned on, new or updated items stay in a pending state. In other words, they are visible only to the creator and the approver. Once approved, the document becomes visible to everyone who has permission to view it. Overall, this process adds an extra layer of control without slowing down teamwork.
For example, in a document library, you might want a manager to review a policy before it goes live. Or in a project list, a supervisor might need to approve a status update before it’s shared with the whole team. These are simple, real situations where content approvals make a difference.
However, using the built-in SharePoint approval workflow alone can feel limited. It often needs manual steps or extra clicks. That’s where SharePoint Content Approvals in Power Automate make a real difference. Power Automate connects SharePoint approvals with automatic actions, turning a basic process into a smooth and reliable one.
Simplify Your Decision with GEM365
Get in touch with GEM365 to guide you through the process and get consultation for free.
Why Automate Approvals with Power Automate
Manual approval steps in Microsoft Power Automate and SharePoint often slow down work, cause mistakes, and create blind spots for teams. For example, someone uploads a file, another person must find it in a library, send an email, wait for a response, and then update the status manually. This kind of process is prone to delay and error.
By contrast, you can build a SharePoint approval workflow that triggers automatically when something changes in a document library. According to Microsoft, you can start flows that react to document-updates, route items for review, and set the content approval status automatically.
Here are key reasons to choose automation for your SharePoint document approval process:
- Speed up approvals: Instead of waiting for someone to remember to act, a flow starts automatically. For example, when a document is created or modified.
- Reduce manual work and errors: Automation ensures the same steps run each time. According to Microsoft, an approval workflow “automatically routes the document … assigns review tasks and tracks their progress” in SharePoint.
- Improve visibility and control: With automated flows, you can track which documents are approved, rejected, or pending. Built-in SharePoint features support content approval so that only approved items are visible to all users.
- Better document management automation: When your team uses automation, you build consistency, compliance and traceability into the process. One blog puts it this way: “Document approval workflow can be considered one of the primary … SharePoint and Power Automate integration tasks.”
In short, when you automate SharePoint approvals using Power Automate, you take a routine yet critical process and make it reliable, fast, and transparent. That helps your team spend less time chasing approvals and more time doing meaningful work.
How to Set Up SharePoint Content Approvals in Power Automate
Setting up SharePoint Content Approvals in Power Automate is straightforward. Follow these steps to create an automated approval workflow:
- Access Power Automate:
Navigate to Power Automate and sign in with your Microsoft 365 account. - Create a New Flow:
Click on Create in the left-hand menu.
Choose Automated cloud flow.
Name your flow (e.g., “Document Approval Flow”).
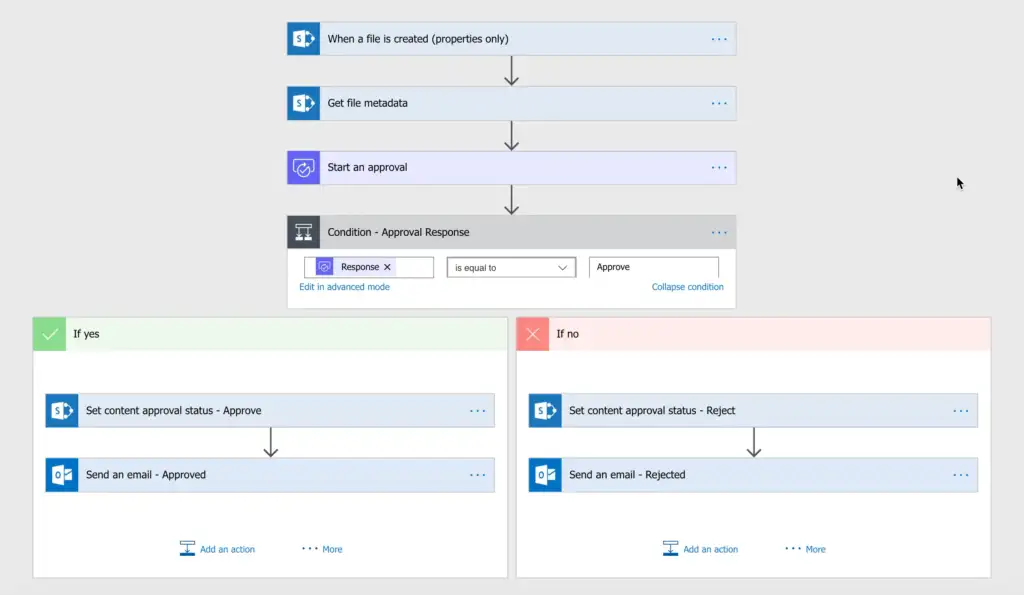
Set the trigger to When a file is created or modified (properties only) in SharePoint. - Configure the Trigger:
Select your SharePoint site and document library.
This ensures the flow activates whenever a document is added or updated. - Add the Approval Action:
Click on New step.
Search for Start and wait for an approval.
Choose the approval type (e.g., Approve/Reject – First to respond).
Fill in the required fields:- Title: Use dynamic content like Title or Name from the trigger.
- Assigned To: Enter the email addresses of the approvers.
- Details: Provide any additional information or context for the approval.
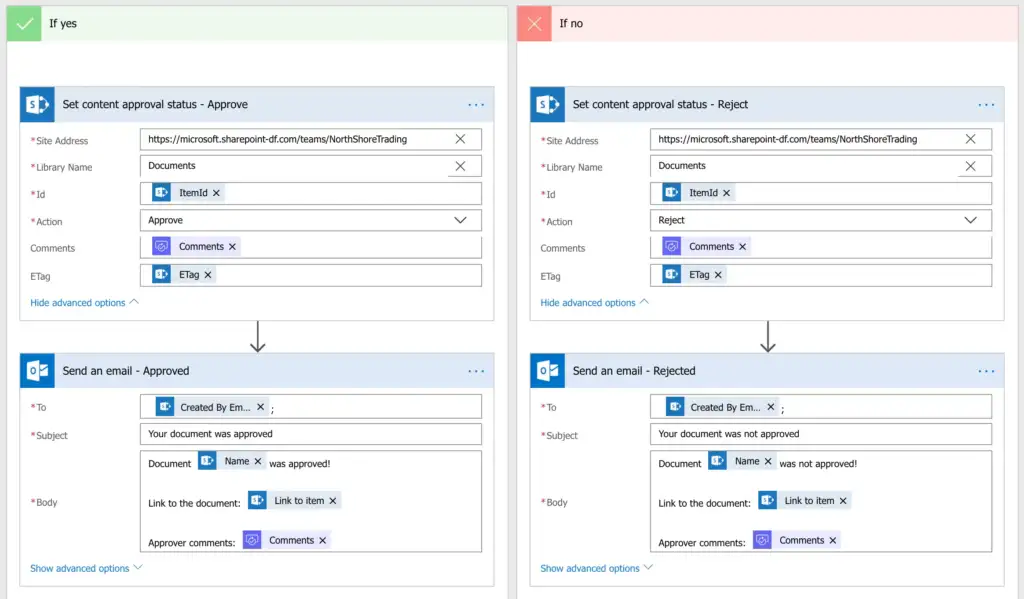
- Set Content Approval Status:
After the approval action, add a new step.
Search for Set content approval status.
Configure the action:- Site Address: Select your SharePoint site.
- Library Name: Choose your document library.
- ID: Use the ID from the trigger.
- Content Approval Status: Set to Approved or Rejected based on the approval outcome.
- Comments: Include any comments from the approver.
- ETag: Use the ETag from the trigger to ensure the correct version is updated.
- Save and Test the Flow:
Click Save to store your flow.
Test the flow by adding or modifying a document in the specified library.
Ensure that the approval request is sent and the content approval status updates accordingly.
By following these steps, you can automate the content approval process in SharePoint using Power Automate, ensuring a streamlined and efficient workflow.
Best Practices for Managing Approval Flows
Once you set up SharePoint Content Approvals in Power Automate, following best practices can make your workflow more reliable and easier to maintain.
- Use Clear Naming Conventions
Name your flows and documents in a way that shows their purpose. For example, “HR Document Approval Flow” or “Project Report Approval.” Clear names help team members quickly understand what each flow does. - Keep Approver Lists Short and Relevant
For instance, avoid sending approvals to too many people. Instead, only include team members who need to review the content. As a result, this reduces delays and keeps the process efficient. - Add Status Columns and Metadata in SharePoint
Track the status of documents using columns like “Pending,” “Approved,” or “Rejected.” Metadata helps both the flow and your team stay organized. - Use Conditional Branches for Exceptions
Sometimes approvals require extra steps, such as additional reviews or escalations. Power Automate allows you to add conditions to handle these cases without breaking the main workflow. - Review Flows Periodically
Over time, your team, documents, or approval process may change. Regularly check flows to make sure they still meet your needs and update them if necessary. - Test Before Going Live
Before rolling out a flow for all users, test it with a small group. Ensure that approvals are triggered, notifications are sent, and statuses update correctly.
By following these best practices, your SharePoint approval workflow becomes more reliable, reduces mistakes, and saves time. Automation works best when it is structured and maintained carefully.
Troubleshooting and Common Issues
Even after setting up SharePoint Content Approvals in Power Automate, you might run into some common issues. Knowing how to solve them helps keep your workflow smooth.
- Flow Does Not Trigger
Sometimes, a flow does not start when a document is created or updated. First, check the trigger settings. Make sure you selected the correct SharePoint site and document library. Also, ensure your account has proper permissions. - Emails Are Not Sent to Approvers
If approvers do not receive notifications, verify that the Start and wait for an approval step is configured correctly. Also, confirm approvers’ email addresses are correct and not blocked by spam filters. - Approval Status Does Not Update
If the SharePoint item remains in “Pending” after approval or rejection, check the Set content approval status Make sure the ID and ETag fields reference the document from the trigger. - Multiple Approvers or Rejections Cause Confusion
For flows with more than one approver, decide whether the first response counts or if all must approve. Use conditional branches to handle different outcomes. This ensures the SharePoint approval workflow works as expected. - Test Before Production
Always test your flow with a sample document. Verify notifications, approval actions, and content status updates. Testing helps catch issues early before deploying it to the whole team.
By understanding these common problems, you can fix them quickly. Your Power Automate SharePoint flow will run reliably, keeping document approvals consistent and transparent.
Final Thoughts
Automating approvals saves time and reduces mistakes. For example, using SharePoint Content Approvals in Power Automate ensures that every document, page, or list item follows a consistent approval process. As a result, teams no longer need to rely on emails or manual tracking, which often causes delays and errors.
Additionally, by setting up a Power Automate approval workflow, you can control who reviews content, track responses, and automatically update the document status in SharePoint. This way, the process becomes more efficient and makes your SharePoint document approval process clearer and more transparent.
Following best practices, like using clear naming conventions, keeping approver lists focused, and testing flows before deployment, ensures your automation runs smoothly. Regular review helps maintain reliability as your team or process evolves.
In short, when you automate SharePoint approvals, you create a dependable system for managing content. Your team gains clarity, saves time, and maintains control over document workflows.
Table of Contents
Read more
- Top Dynamics 365 Sales Features: Transform Sales Performance
- Microsoft 365 vs Office 365: Key Differences Explained
- Business Central Cloud vs On Premises: Which to Choose
- Forbes Reveals the Best Cloud ERP: Here’s Why Business Central Wins
- How the Microsoft Power Apps Platform Transforms Manual Processes

Top Dynamics 365 Sales Features: Transform Sales Performance


Forbes Reveals the Best Cloud ERP: Here’s Why Business Central Wins

How the Microsoft Power Apps Platform Transforms Manual Processes