Nikoo Samadi
Every office has that one form, the one buried in a SharePoint list that everyone dreads opening. It never quite fits what people need. Maybe it asks for information that doesn’t apply. Maybe it hides the field you actually use. Or maybe it just looks like it was built a decade ago and never changed. At some point, someone says, “We should really customize this SharePoint list form.” That’s usually when the search begins for an easier way to make it work better. For many teams, the answer turns out to be Power Apps. It lets you customize a SharePoint list form to match how your team actually works, no code, no complex setup, and no new system to learn. You can take the form everyone avoids and turn it into one people actually like using.
What SharePoint Lists and Power Apps Are
Imagine a table in Excel that you share with your team. You add tasks, update statuses, track items, simple, right? That’s the basic idea behind a list in SharePoint: a shared structure to store data in rows (items) and columns (fields).
But here’s where it gets useful: Unlike a spreadsheet, a SharePoint list is built for collaboration. You get permissions, version history, and easy sharing across your organization, so multiple people can work from the same list without confusion.
Now, every SharePoint list includes a form, a screen where you fill in or edit data. Out of the box, the form works, but it’s often rigid: fixed layout, limited logic, the same fields for everyone. That’s when you may want to customize a SharePoint list form to meet your team’s actual way of working.
Enter Power Apps. This is Microsoft’s low-code tool that lets you build apps and forms without deep programming. You can drag & drop controls, tweak layouts, and connect to your SharePoint list seamlessly.
Here’s how they work together:
- You have a SharePoint list storing your data (tasks, requests, assets)
- You open Power Apps and tell it, “Use this list as my data source”
- Power Apps creates a customized form connected to that list
- You publish the form, and the users of the list now see your custom layout instead of the generic one
In short: SharePoint keeps doing its job (storing data), and Power Apps gives you the freedom to shape how people interact with that data. No need to rebuild your process from scratch, just adjust the part people use every day. You can learn more about SharePoint here.
Simplify Your Decision with GEM365
Get in touch with GEM365 to guide you through the process and get consultation for free.
Why Customize a SharePoint List Form
If you’ve ever used a default SharePoint list form, you know the experience: every field appears in the same order, even when half of them don’t apply to you. Maybe you’re filling out an expense request, but you still see fields meant for a different department. It works, but it’s not smooth.
This is why many teams choose to customize a SharePoint list form to make the experience fit the process instead of forcing the process to fit the form.
Customizing forms gives you control. You can:
- Show or hide fields based on user input.
- Add validation rules to prevent mistakes.
- Reorder sections to match your workflow.
- Guide users with clear labels and conditional formatting.
These small changes can have a big impact. A tailored form saves time, reduces frustration, and improves data accuracy. In a busy team environment, that means fewer back-and-forth messages and cleaner reports.
Microsoft describes this approach as part of its “low-code” movement, empowering business users to build tools that match their needs without relying entirely on IT.
When you customize a SharePoint list form with Power Apps, you’re not just changing how it looks. You’re shaping how information moves through your organization. Each tweak helps align the tool with how people actually work and that’s where efficiency starts.
How to Create a Custom Form
Customizing a SharePoint list form with Power Apps sounds technical, but it’s easier than most people expect. You don’t have to be a developer. If you can build a simple spreadsheet, you can build a form that feels polished and professional.
Below is a practical, step-by-step guide to get you started.
Step 1: Open Your SharePoint List
Go to the list you want to improve. This could be a task tracker, request form, or asset register. You’ll need edit permission for the list.
If you’re new to lists, Microsoft offers a simple walkthrough here: Create a list in SharePoint.
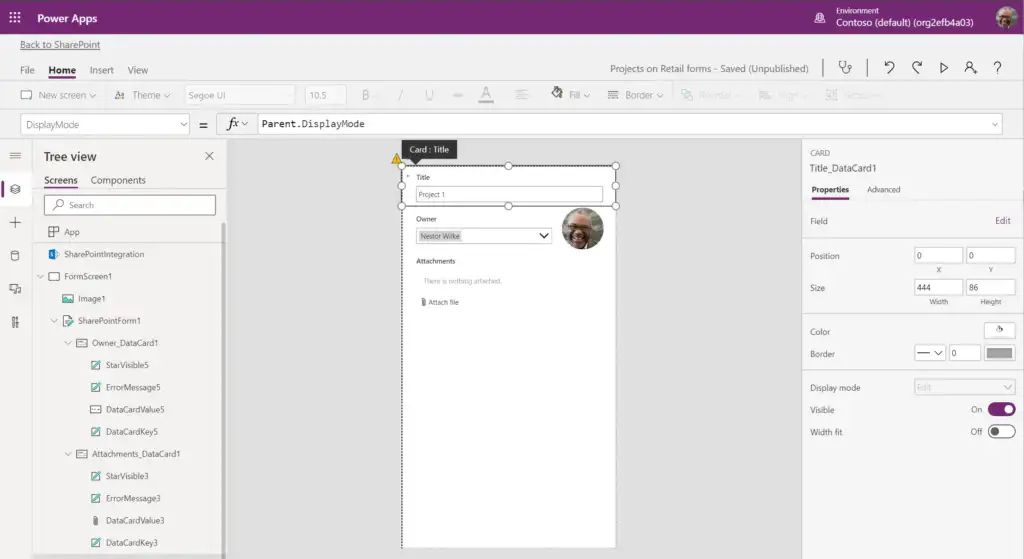
Step 2: Launch Power Apps
In the list menu, select Integrate → Power Apps → Customize forms.
SharePoint will open Power Apps Studio in your browser. The list fields automatically appear inside a form layout. You’re now looking at a live, editable version of your list form, connected to the same data.
If you’ve never used Power Apps before, check Microsoft’s official intro: Customize a SharePoint list form using Power Apps.
Step 3: Adjust the Layout
In Power Apps Studio, you can drag, resize, and reorder fields. Move related items together like “Department,” “Manager,” and “Request Date.” You can also change the number of columns or switch between vertical and horizontal layouts.
The preview mode lets you see exactly how it will look to users. Keep things simple and uncluttered. A clean layout makes your form easier to read and faster to fill out.
Step 4: Add Logic and Rules
This is where Power Apps becomes powerful. You can control visibility, apply validation, and even calculate values automatically.
For example, to show a “Reason for Travel” field only when “Travel Required” is selected, you can set this formula in the field’s Visible property:
If (TravelRequired.Value = true, true, false)
It’s as simple as an Excel formula.
You can also mark certain fields as required or restrict entries to specific formats. That ensures consistent, clean data across your list.
Step 5: Test, Save, and Publish
Before publishing, use the Preview button to test your form. Add a few sample entries and make sure the logic works as expected.
When you’re satisfied, click Publish to SharePoint.
From that point, anyone using your list will see your customized form instead of the default one. If you need to make changes later, just reopen Power Apps from the same list and update it.
For peace of mind, SharePoint keeps version history, so you can roll back to an earlier version if needed.
Customization Techniques and Best Practices
Once you’ve learned how to customize a SharePoint list form, the next step is refining it. Power Apps gives you plenty of creative freedom, but the best forms are the ones that feel effortless to use. They guide people without making them think about how the form works.
Here are a few proven ways to keep your design clean, useful, and reliable.
Keep the Layout Simple
It’s tempting to add every field and label, but less is more. Group related information together, use section headings, and leave space between areas.
Two-column layouts often work best on desktops, while single-column layouts fit mobile screens better.
The goal isn’t to impress it’s to make sure users know exactly where to look and what to do next. Microsoft’s Power Apps design guidance offers more practical layout tips.
Use Conditional Visibility
Power Apps lets you hide or show fields based on what users select. This keeps the form uncluttered and relevant.
For example, if someone chooses “Yes” for Needs Manager Approval, you can display a new field for Manager Name. If they choose “No,” the field stays hidden.
It’s a small touch that makes the form feel smart and personal.
Validate Data Before Submission
Clean data saves headaches later. You can use simple formulas to check that entries are complete and valid. For instance:
- Ensure an email address contains “@”
- Confirm that a date isn’t in the past
- Limit number fields to positive values
Validation not only prevents errors but also builds confidence that the form will “just work.”
For reference, Microsoft provides a handy guide to Power Apps formulas and functions.
Add Helpful Controls
Dropdowns, radio buttons, sliders, and icons make forms easier to complete. Replace long text boxes with dropdown lists where possible—especially when users need to choose from fixed options like departments or categories.
This reduces typing, speeds up submissions, and keeps your data consistent.
Match Your Company’s Branding
You can add subtle branding to make the form feel like part of your company’s environment. Use your organization’s colors for headers, or include a small logo in the corner. Just keep it simple consistency matters more than decoration.
Test with Real Users
Before publishing widely, ask a few team members to try the form. Watch how they interact with it. Do they pause at certain fields? Do they miss key steps?
Their feedback will help you refine the flow. Sometimes, a small label change or reordered field can make a big difference.
A well-designed form doesn’t call attention to itself it just works. By applying these best practices, you’ll create a SharePoint list form that feels natural, helps users move faster, and keeps your data accurate from day one.
Adding Automation
Once your customized SharePoint list form works smoothly, you can take it a step further by adding automation. Automation turns a static form into a living part of your workflow, it moves information, notifies people, and keeps things on track without manual follow-up.
This is where Power Automate (formerly Microsoft Flow) fits in. Power Automate connects your SharePoint list and Power Apps form to hundreds of other services, Outlook, Teams, Excel, even third-party apps like Slack or Trello. It lets you create “flows” that respond automatically when something happens in your list.
What Automation Can Do
Here are a few examples of what you can build in minutes:
- Send a confirmation email when someone submits a new form entry.
- Notify a manager for approval when a specific condition is met (for example, if total cost exceeds $1,000).
- Post an update to Microsoft Teams when a task is marked complete.
- Update another SharePoint list automatically when status changes.
These actions can all run in the background, no extra clicks or reminders needed.
Automation removes the small, repetitive tasks that often slow down a process.
How to Create an Automated Flow
You can start directly from your SharePoint list:
- Open your list and choose Integrate → Power Automate → Create a flow.
- Pick a template (like “Send an email when a new item is added”).
- Customize the actions—decide what should happen, who gets notified, and what information to include.
- Save your flow and test it using a sample submission.
Power Automate gives you full control but keeps the setup visual and intuitive. You don’t need to code, just define triggers and outcomes.
For beginners, Microsoft’s Power Automate template gallery is a great place to explore ready-made examples.
Sharing and Managing Custom Forms
After you customize a SharePoint list form, the next step is making sure others can use it safely and easily. Publishing, permissions, and maintenance all matter as much as design. The goal is to share your form so everyone benefits from it, without losing control of your data.
Publishing the Form
When you click Publish to SharePoint in Power Apps, your form becomes the default experience for that list. Everyone who has access to add or edit items will see your customized version automatically.
If you ever need to make updates, reopen the same list, choose Integrate → Power Apps → Customize forms, adjust your layout, and publish again. The change appears instantly for all users.
You can read Microsoft’s official publishing guidance here: Publish and share apps in Power Apps.
Managing Permissions
One of SharePoint’s strengths is built-in security. Your form inherits the same permissions as the list itself. That means you don’t need to set up new user roles or passwords, only the people who can already view or edit the list will see the form.
If you want finer control, you can adjust permissions directly within the list’s Settings → Permissions for this list. Microsoft details how to do that here: Customize permissions for a SharePoint list or library.
Version Control and Updates
Power Apps keeps a version history of your form. Each time you publish, a new version is saved. If an update causes an issue, you can roll back to a previous version. It’s good practice to label versions by date or change summary, so you know what was modified and why.
Testing and Communication
Before releasing a major update, test it with a small group of users. They can spot issues or usability problems early. Once it’s ready, communicate the changes to your wider team, ideally with a short note or walkthrough. When users understand what’s new, adoption is smoother.
Ongoing Maintenance
A customized form isn’t something you build once and forget. Processes evolve, and your form should evolve with them. Schedule occasional reviews to make sure fields, rules, and automations still fit your workflow.
If your organization grows or your data becomes more complex, you might consider connecting your list to Microsoft Dataverse for more scalability.
When you share and maintain your Power Apps form thoughtfully, you keep it secure, relevant, and reliable. It becomes a steady part of how your team works.
Final Thoughts
Customizing a SharePoint list form isn’t about making it look fancy. It’s about making it fit. When a form reflects the way people actually work, everything else becomes easier, data stays cleaner, processes run smoother, and users stop dreading the daily routine of filling it out.
Power Apps gives you the tools to do that without writing code or building a new system from scratch. You start with the form you already use, then shape it around your team’s real needs. Over time, those small improvements, clearer fields, smarter logic, automated steps, add up to real efficiency.
The best part? It all stays inside your existing Microsoft 365 environment. Your data stays secure in SharePoint, your workflows run through Power Automate, and your forms remain easy to update as your process grows.
So start small. Pick one list, open Power Apps, and see what’s possible. When you customize a SharePoint list form, you’re not just changing a page, you’re improving how your team works, one field at a time.
Table of Contents
Read more
- How to Consolidate Multi-Company Financials in Microsoft Dynamics 365 Business Central
- Top Dynamics 365 Sales Features: Transform Sales Performance
- Microsoft 365 vs Office 365: Key Differences Explained
- Business Central Cloud vs On Premises: Which to Choose
- Forbes Reveals the Best Cloud ERP: Here’s Why Business Central Wins

How to Consolidate Multi-Company Financials in Microsoft Dynamics 365 Business Central

Top Dynamics 365 Sales Features: Transform Sales Performance


Forbes Reveals the Best Cloud ERP: Here’s Why Business Central Wins